
This guide will walk you through the steps to create Photoshop brushes from images and edit different elements of your brushes to fit your needs.
Photoshop brushes are the bread and butter of all digital artists or passionate enthusiasts. They allow us to create exciting things from monsters for a movie poster to a funny sketch for the New Yorker. But, like any artist, you need the right tools to get you going.
One of the goals of these brushes is to give you smaller tools as well. Larger brushes (like what Photoshop provides) are difficult to work with and they actually slow down the program causing freezes and crashes if your computer is a little older.
The smaller brushes will stay crisp and sharp, giving you those refined edges you want for a finished product. You can download brush templates on our site for free or you can edit your own brushes to suit your needs. This isn’t an exact science and will require some trial and error on your part but you can follow the steps below to learn how to customize your own Photoshop brushes.
Step 1: Create a New Photoshop Document
We are going to begin by creating a completely new brush in Photoshop so open up the program when you’re ready to begin. In the “File” menu at the top of your screen, select “New.” This will give you the option to choose your canvas size. You might already know how large you want your canvas based on your project or you might have no idea.
If you’re just trying to learn with no goal in mind, start by choosing a 600 x 600-pixel document or for a faster way to create a new document, press Ctrl+N (Win) / Command+N (Mac) on your keyboard.[/vc_column_text][/vc_column][/vc_row][vc_row][vc_column][vc_single_image image=”10837″ img_size=”large”][/vc_column][/vc_row][vc_row][vc_column][vc_column_text]Go to File > New.
In the dialog box, enter the dimensions, like in the image you see below (600 for both the Width and Height options). Don’t forget to set the options to “Pixels” as well. You can also choose the color of your canvas. The default is set to white and this is usually a good way to start your new project.
Now, hit the “OK” when you’re done. A new canvas will open with your 600 x 600-pixel dimensions! How exciting!
[/vc_column_text][/vc_column][/vc_row][vc_row][vc_column][vc_single_image image=”10838″ img_size=”large”][/vc_column][/vc_row][vc_row][vc_column][vc_column_text]Step 2: Import a New ImageStart by finding an image you want to convert to a brush then dragging the file over to your new canvas. Make sure the image is smaller than your 600 x 600-pixel canvas. In the following example, we’ve chosen this simple wood design. A bit boring, we know, but it makes the guide easier to see and understand.
[/vc_column_text][/vc_column][/vc_row][vc_row][vc_column][vc_single_image image=”10839″ img_size=”large”][/vc_column][/vc_row][vc_row][vc_column][vc_column_text]Step 3: Create Brush from ImageYour next step is to convert the image to black and white. You can do this by going to the “Image” at the top of your screen, then selecting “Black and White.”
[/vc_column_text][/vc_column][/vc_row][vc_row][vc_column][vc_single_image image=”10840″ img_size=”large”][/vc_column][/vc_row][vc_row][vc_column][vc_column_text]Now select your settings and click ok. [/vc_column_text][/vc_column][/vc_row][vc_row][vc_column][vc_single_image image=”10841″ img_size=”large”][/vc_column][/vc_row][vc_row][vc_column][vc_column_text]You should have something that looks like the image above. Once converted, go to Edit > Define Brush Preset. [/vc_column_text][/vc_column][/vc_row][vc_row][vc_column][vc_single_image image=”10842″ img_size=”large”][/vc_column][/vc_row][vc_row][vc_column][vc_column_text]You should receive a dialog box, asking you to give your new brush a name. Go ahead and choose a name that you can easily identify. For this tutorial, I’ll call it “Sampled Brush 1″. [/vc_column_text][/vc_column][/vc_row][vc_row][vc_column][vc_single_image image=”10843″ img_size=”large”][/vc_column][/vc_row][vc_row][vc_column][vc_column_text]Step 4: Use the Newly Created BrushSelect the brush tool in the left-hand menu.[/vc_column_text][/vc_column][/vc_row][vc_row][vc_column][vc_single_image image=”10844″ img_size=”large”][/vc_column][/vc_row][vc_row][vc_column][vc_column_text]Then go to the BRUSH PRESETS window and select the brush. If you do not see this window, simply go to “Window” at the top of your screen and select the “Brush Presets” option to have it appear in your workstation.
[/vc_column_text][/vc_column][/vc_row][vc_row][vc_column][vc_single_image image=”10846″ img_size=”large”][/vc_column][/vc_row][vc_row][vc_column][vc_column_text]Then, find your new brush at the bottom of the list of presets. [/vc_column_text][/vc_column][/vc_row][vc_row][vc_column][vc_single_image image=”10848″ img_size=”large”][/vc_column][/vc_row][vc_row][vc_column][vc_column_text]Now you are free to use the brush like you would normally. [/vc_column_text][/vc_column][/vc_row][vc_row][vc_column][vc_single_image image=”10849″ img_size=”large”][/vc_column][/vc_row][vc_row][vc_column][vc_column_text]Step 5: Open The Brushes Panel
Your new brush might have the cool design that you need but does it behave the way you want? Is it the right size, shape, and stroke that you need for your project?
If you really want to customize your brush or even one of the Photoshop preset brushes, you can go to the Brushes panel. This window allows you to do some pretty cool things with your brush presets.
The Brushes panel can be accessed by going to the Window menu at the top of the screen and the selecting Brush from the list of options. You can also press the F5 key on your keyboard as a nifty shortcut.
You should see something like the image below appear. Now, just choose the brush you want to customize.
The image at the bottom of this menu shows you what the brush currently looks like and what it will look like once you change some of the options.[/vc_column_text][/vc_column][/vc_row][vc_row][vc_column][vc_single_image image=”10850″ img_size=”large”][/vc_column][/vc_row][vc_row][vc_column][vc_column_text]
Step 6: Adjust the Brush Tip Spacing
Click on the words Brush Tip Shape directly below the Brush Presets option. Photoshop brushes work by stamping the image of your brush as you drag your mouse across the document. If your brushstrokes are close, enough, they will appear to be seamless, if not, they look jagged.
You can actually change this effect on the brush, depending on the effect you want, but usually, you want everything to look seamless.
The Brush Tip Shape option allows you to control the spacing of your stamps, separating them or bringing them closer together. You can control the spacing by changing the percentage of the width of your brush tip, and by default, it’s set to 25 percent.
[/vc_column_text][/vc_column][/vc_row][vc_row][vc_column][vc_single_image image=”10851″ img_size=”large”][/vc_column][/vc_row][vc_row][vc_column][vc_column_text]In our example, we chose a seamless brush. This setting “stamps” closer together. [/vc_column_text][/vc_column][/vc_row][vc_row][vc_column][vc_single_image image=”10852″ img_size=”large”][/vc_column][/vc_row][vc_row][vc_column][vc_column_text][/vc_column_text][vc_column_text]As displayed in the example above, by changing the slider to 115 percent, we can now have a seamless effect.Note: You will need to press “Shift” then move the mouse to get the brush in a perfectly horizontal line.
OTHER OPTIONS:
These Include:
- Size:
Moving this slider left will decrease the size of the brush, moving towards the right will increase the brush size
- Flip X / Flip Y:
This to flip the brush on its X or Y axis.
- Angle:
This changes the brush’s orientation.
- Roundness:
This will change the roundness of the brush.[/vc_column_text][/vc_column][/vc_row][vc_row][vc_column][vc_single_image image=”10853″ img_size=”large”][/vc_column][/vc_row][vc_row][vc_column][vc_column_text]
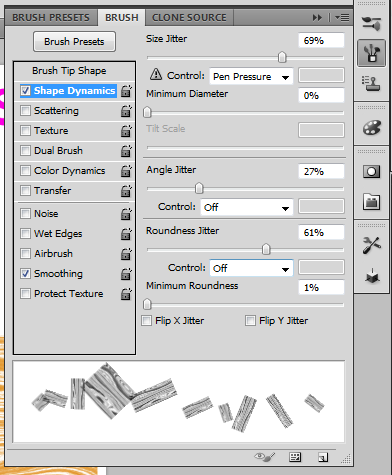
Step 7: Select The Shape Dynamics Option
Click directly on the words Shape Dynamics below the Brush Tip Shape option we selected a moment ago, which gives us options for dynamically controlling the size, angle and roundness of the brush tip as we paint. Make sure you click on the words themselves. Clicking inside the checkbox to the left of words will turn the options on but won’t give us access to their controls.[/vc_column_text][/vc_column][/vc_row][vc_row][vc_column][vc_single_image image=”10854″ img_size=”large”][/vc_column][/vc_row][vc_row][vc_column][vc_column_text]
- Size Jitter:
This gives random sizes to the brush while using.
- Minimum Diameter:
This controls how small the brush can be.
- Angle Jitter:
This randomly controls the angle of the brush.
- Roundness Jitter:
This randomly controls the roundness of the brush.[/vc_column_text][/vc_column][/vc_row]
Check this out while you wait!