

Learn the formula for appending text in Excel with our guide. The act of appending text within an Excel spreadsheet means you are taking existing information and creating new rows of information that incorporates the existing information. This is used within companies and businesses to keep track of client status, changes in employee information, and much more.
Download the example and follow along.
Begin by downloading and opening the above spreadsheet. Follow the next steps to learn how to easily append text.
Step by Step Process to Appending Text in Excel:
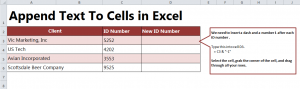
- Start by selecting the cell you want new information added to. In the example, the cell is D3.
- In the selected cell (D3), enter the equal sign and then “C3”. This tells Excel what other cell you are referencing.
- Following the reference cell (C3), enter – & “-1”.
- The -1 is what you want added to the reference cell in the new row space.
- The full formula here reads: = C3 & “-1”. When finished, your new entry in D3 should read “5252-1”.
- Drag the D3 cell tool down the row you want the entered formula applied onto, and it will append the text in these cells for you.
Simple, right? This formula can be used in any instance where you need to add additional information to an Excel entry after the previously entered cell. Use this formula in your business or professional Excel files to keep track of client progress and status and more. You can also use this for your personal files to indicate the progress of projects, changes in contact status, or other new developments. Play with the formula to discover more.
Tip for Appending Text: Use this example spreadsheet to practice different appending techniques. Replace “-1” with “Awesome Client” to see the difference.
Visit our Excel Guides to learn more fun Excel techniques.
Check this out while you wait!