Imagine it’s the first day of college and you have your books, a notepad, and your laptop ready to go. You get to school and – oops – where is your first class located again? What was the instructor’s name?
Avoid these issues by using the easy Semester Schedule Template, an Excel file that arranges your school data into one adjustable and simple to follow format. Keep track of your class times, deadlines, and your weekly schedule all in one template.
How to use the Semester Schedule Template
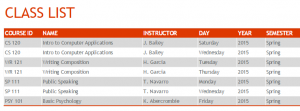
Download the Excel file below and open up the first page of the template. This contains your class list for your semester(s). It is pre-populated, so start by entering in your actual course IDs, class names, and information about the class. Note that the data entered into the “Time Start” and “Time End” columns will automatically generate the data in the “Duration” column.
At the bottom of the Excel program, select the next tab labeled “Deadlines”. Here, you can enter your Course ID, and the course name and information will be updated automatically. Under “Item Description”, put in important events such as finals, essays, and presentations. In the right column over, enter the due date. This is an easy way to track how much time you have between big assignment deadlines.
The next bottom tab is your “Weekly Schedule”. This part is a breeze – right click the orange tab labeled “Class” and choose “Refresh”. From the information you entered in the “Class List” tab, your weekly schedule will be populated with data. If you ever change your class list, simply refresh on the weekly schedule page again and it will be updated.
Finally, the last tab is the “Semester Calendar”. On the far right, enter in the year, the day you start class, and the last day of class. This will generate a semester calendar for you that spans from the start to end date. The deadlines you entered in the “Deadlines” tab will have their dates displayed in red automatically.
Tips on using the Semester Schedule Template
- Follow the order of the tabs at the bottom, starting with “Class List”, as most of the other tabs will have their data populated from this.
- Print out a hard copy of each page to carry with you in case you don’t have access to a computer. This will be especially handy your first week as you learn to navigate your classes.
- Remember to refresh any automatically populated data fields when you change, add, or delete something from your Class List tab.
Download: Semester Schedule
Template courtesy of Microsoft
Check this out while you wait!
