If you have Apple’s latest mobile OS installed on your device, you’re in good shape to using some of the new features that Apple has made available for you. You might be familiar with most of them already but if you’re really looking to wow people with your skills as a photographer then ability to shoot RAW photos from an iOS device is a must!
If you’re new to the concept entirely, then RAW is simply capturing a photo in a specific format, free of any post image processing. While some may be daunted by this, others can see the possibilities, including the control you’ll have over your photos.
You can use this feature for both iPhone and iPad!
Well, let’s get started taking your awesome RAW images!
How to Take RAW Images
Step 1: Download an app that has the capability of performing this action. There are quite a few on the market already but one that we like is the Manual app. Go ahead and download this application now.
Step 2: Next, launch the app once it finishes downloading. You will then go to the Settings cog icon in the in the bottom right-hand corner.
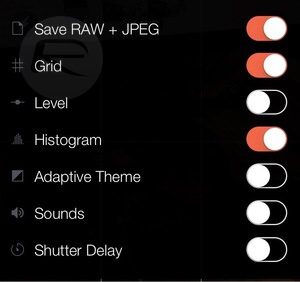
Step 3: You should see a menu like the one displayed below. Make sure the RAW + JPEG is turned on when you save your settings.[/vc_column_text][/vc_column][/vc_row][vc_row][vc_column][vc_single_image image=”11098″ img_size=”full”][/vc_column][/vc_row][vc_row][vc_column][vc_column_text]Step 4: You’ll see another action sheet from the bottom of the display with two options. It will ask you if you want to save any captured image as a RAW file in DNG format or the two individual files as RAW and JPEG. If you choose the second option, you’ll take up additional space on your device.
That’s about it! Now you can go off into the great unknown and capture each new experience with stunning quality![/vc_column_text][/vc_column][/vc_row]
Check this out while you wait!
