Get started today!
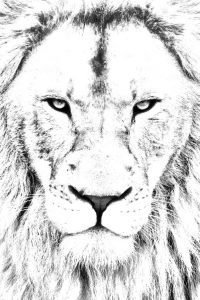
You will begin by opening the photo you want to use in Photoshop.[/vc_column_text][/vc_column][/vc_row][vc_row][vc_column][vc_single_image image=”11211″ img_size=”medium”][/vc_column][/vc_row][vc_row][vc_column][vc_column_text]Then press Ctrl + J or right click on the Background Layer & Duplicate Layer.[/vc_column_text][/vc_column][/vc_row][vc_row][vc_column][vc_single_image image=”11212″ img_size=”medium”][/vc_column][/vc_row][vc_row][vc_column][vc_column_text]Click on the Adjustment Layer > Hue/Saturation…[/vc_column_text][/vc_column][/vc_row][vc_row][vc_column][vc_single_image image=”11213″ img_size=”medium”][/vc_column][/vc_row][vc_row][vc_column][vc_column_text]Reduce the Saturation to -100. This will turn the image black & white.[/vc_column_text][/vc_column][/vc_row][vc_row][vc_column width=”1/2″][vc_single_image image=”11214″ img_size=”medium”][/vc_column][vc_column width=”1/2″][vc_single_image image=”11215″ img_size=”medium”][/vc_column][/vc_row][vc_row][vc_column][vc_column_text]Click on the Layer 1 to make it active and change the blend mode to Color Dodge.[/vc_column_text][/vc_column][/vc_row][vc_row][vc_column width=”1/2″][vc_single_image image=”11216″ img_size=”medium”][/vc_column][vc_column width=”1/2″][vc_single_image image=”11217″ img_size=”medium”][/vc_column][/vc_row][vc_row][vc_column][vc_column_text]Invert it by pressing Ctrl + I or by going to Image > Adjustments > Invert. This will convert the image pretty much into white.[/vc_column_text][/vc_column][/vc_row][vc_row][vc_column][vc_single_image image=”11218″ img_size=”medium”][/vc_column][/vc_row][vc_row][vc_column][vc_column_text]Now go to Filter > Blur > Gaussian Blur… Adjust the blur Radius to an amount that looks good to you.[/vc_column_text][/vc_column][/vc_row][vc_row][vc_column][vc_single_image image=”11219″ img_size=”medium”][/vc_column][/vc_row][vc_row][vc_column][vc_column_text]To make the overall look denser, click on the Adjustment Layer button again and choose Levels…[/vc_column_text][/vc_column][/vc_row][vc_row][vc_column][vc_single_image image=”11220″ img_size=”medium”][/vc_column][/vc_row][vc_row][vc_column][vc_column_text]Slide the input Darks to the right until the face looks like the right amount of density.[/vc_column_text][/vc_column][/vc_row][vc_row][vc_column][vc_single_image image=”11221″ img_size=”medium”][/vc_column][/vc_row][vc_row][vc_column][vc_column_text]If the other areas are too dense, select the Brush Tool, make the brush size relatively large, Hardness 0%, the Opacity 40%, the Foreground Color is Black.[/vc_column_text][/vc_column][/vc_row][vc_row][vc_column][vc_single_image image=”11222″ img_size=”medium”][/vc_column][/vc_row][vc_row][vc_column][vc_column_text]While keeping the Levels 1 layer selected, brush over areas you like to make less dense.[/vc_column_text][/vc_column][/vc_row][vc_row][vc_column][vc_single_image image=”11223″ img_size=”medium”][/vc_column][/vc_row][vc_row][vc_column][vc_column_text]To clean up some areas, make a composite snapshot by pressing Ctrl + Shift + Alt + E. Invert the foreground color to White. Make the brush size small to medium & the Opacity 100%.[/vc_column_text][/vc_column][/vc_row][vc_row][vc_column width=”1/2″][vc_single_image image=”11224″ img_size=”medium”][/vc_column][vc_column width=”1/2″][vc_single_image image=”11225″ img_size=”medium”][/vc_column][/vc_row][vc_row][vc_column][vc_column_text]Now simply brush over the areas you would like to clean up. Using this procedure, you can change any photos to pencil sketch.[/vc_column_text][/vc_column][/vc_row][vc_row][vc_column][vc_single_image image=”11226″ img_size=”medium”][/vc_column][/vc_row]
Check this out while you wait!
