
Start by making a new file. I’ve used 650 x 500px canvas size, 72 px/in resolution.
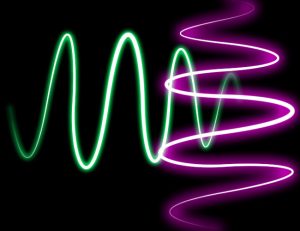
Select your brush tool.[/vc_column_text][/vc_column][/vc_row][vc_row][vc_column][vc_single_image image=”11247″ img_size=”medium”][/vc_column][/vc_row][vc_row][vc_column][vc_column_text]Adjust brush settings. Brush Size: 9px, Hardness: 100%.[/vc_column_text][/vc_column][/vc_row][vc_row][vc_column][vc_single_image image=”11248″ img_size=”medium”][/vc_column][/vc_row][vc_row][vc_column][vc_column_text]Now open the Brush window by going to Window > Brush. There check Shape Dynamics & select Pen Pressure under the Size Jitter Control. This is important to get nice tapered edges later.[/vc_column_text][/vc_column][/vc_row][vc_row][vc_column][vc_single_image image=”11249″ img_size=”medium”][/vc_column][/vc_row][vc_row][vc_column][vc_column_text]Set your Foreground color to White.[/vc_column_text][/vc_column][/vc_row][vc_row][vc_column][vc_single_image image=”11250″ img_size=”medium”][/vc_column][/vc_row][vc_row][vc_column][vc_column_text]Now select the Pen Tool. Make sure Paths is selected. This will allow us to create a single line instead of full shape.[/vc_column_text][/vc_column][/vc_row][vc_row][vc_column][vc_single_image image=”11251″ img_size=”medium”][/vc_column][/vc_row][vc_row][vc_column][vc_column_text]Create a new layer[/vc_column_text][/vc_column][/vc_row][vc_row][vc_column][vc_single_image image=”11252″ img_size=”medium”][/vc_column][/vc_row][vc_row][vc_column][vc_column_text]Start by clicking where the line will begin then click & drag for the 1st curve. Continue this process until desired shape if achieved.[/vc_column_text][/vc_column][/vc_row][vc_row][vc_column][vc_single_image image=”11253″ img_size=”medium”][/vc_column][/vc_row][vc_row][vc_column][vc_column_text]Now that we have our path setup, we need to fill it in. Right-click on the canvas & select Stroke Path…[/vc_column_text][/vc_column][/vc_row][vc_row][vc_column][vc_single_image image=”11254″ img_size=”medium”][/vc_column][/vc_row][vc_row][vc_column][vc_column_text]This will open a dialog box. Go ahead and select Brush & check Simulate Pressure.[/vc_column_text][/vc_column][/vc_row][vc_row][vc_column][vc_single_image image=”11255″ img_size=”medium”][/vc_column][/vc_row][vc_row][vc_column][vc_column_text]This will give us the tapered edges to our path.[/vc_column_text][/vc_column][/vc_row][vc_row][vc_column][vc_single_image image=”11256″ img_size=”medium”][/vc_column][/vc_row][vc_row][vc_column][vc_column_text]To remove the lines, go to Paths & delete Work Path, either by pressing Delete or dragging it down to the Delete current path icon.[/vc_column_text][/vc_column][/vc_row][vc_row][vc_column][vc_single_image image=”11257″ img_size=”medium”][/vc_column][/vc_row][vc_row][vc_column][vc_column_text]Go back to the Layers Tab and double-click on the Layer 1 layer to open the Layer Style window. There select Outer Glow. Change the color. Pick a bright color; change the Spread to 8% & size to 13px. Depending on your image size & resolution, these values may vary.[/vc_column_text][/vc_column][/vc_row][vc_row][vc_column][vc_single_image image=”11258″ img_size=”medium”][/vc_column][/vc_row][vc_row][vc_column][vc_column_text]I added another layer, which is basically a copy of the current layer. I then changed the orientation, color to make it look like as below. This will give you the final product.[/vc_column_text][/vc_column][/vc_row][vc_row][vc_column][vc_single_image image=”11259″ img_size=”medium”][/vc_column][/vc_row]
Check this out while you wait!