
Self-Install your thermostat on the wall
First, you’ll need to take a picture of your current thermostat’s wiring.[/vc_column_text][/vc_column][/vc_row][vc_row][vc_column][vc_single_image image=”11413″ img_size=”large”][/vc_column][/vc_row][vc_row][vc_column][vc_column_text]Next, turn off the power to your heating and cooling system in your house (the breaker). You can double-check to see if it’s off by changing the temperature and seeing if the system turns on.
Now you can remove your thermostat’s cover to expose the wiring underneath.
Make sure that you label the wires from your old thermostat as you continue unplugging them. A cheap marker will suffice for this task.
You will also need to mark the Nest wires with their corresponding markings so you know how it should be attached to your system.
You can skip these steps if your wires are already color-coordinated.
Note: If your thermostat is labeled 120 or 240v, or has thick wires, you could have high-voltage wires and you should not connect them.
Confirm that your system is compatible and get a wiring diagram.[/vc_column_text][/vc_column][/vc_row][vc_row][vc_column][vc_single_image image=”11414″ img_size=”large”][/vc_column][/vc_row][vc_row][vc_column][vc_column_text]
Mark the position of the Nest.
Start by threading the wires through the center of the Nest base plate. Now, use a leveler to make sure the Nest is leveled then, use a simple pencil to mark where the screws need to go.
Attach the Nest base to the wall.
Line up your Nest with the screw marks and begin to screw in the device, fastening it to your wall.
Connect the wires to the Nest.
Using your pictures or the colors as a reference, begin attaching the wires that to your Nest device like the image below.[/vc_column_text][/vc_column][/vc_row][vc_row][vc_column][vc_single_image image=”11415″ img_size=”large”][/vc_column][/vc_row][vc_row][vc_column][vc_column_text]
Attach the Nest display.
Line up the small rectangular connector on the back of the display with the port on the base plate.[/vc_column_text][/vc_column][/vc_row][vc_row][vc_column][vc_single_image image=”11416″ img_size=”large”][/vc_column][/vc_row][vc_row][vc_column][vc_column_text]
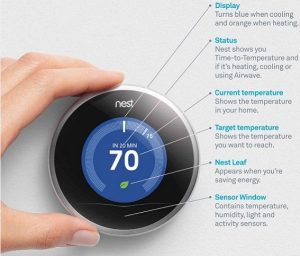
Follow on-screen setup instructions.
After turning on the power supply and the Nest itself, you will follow the on-screen instructions to set up your device and change the temperature settings to your liking.[/vc_column_text][/vc_column][/vc_row][vc_row][vc_column][vc_single_image image=”11417″ img_size=”large”][/vc_column][/vc_row]
Check this out while you wait!