
One of the best ways to make your own GIF is through the Adobe Photoshop. This program will let you create custom GIF animations within a few simple steps.
If you want to learn how to make your own GIFs, then follow the set of instructions that we have provided for you below.
You will start by pulling up the images you want in a separate folder. When you’re ready, you can upload them into Photoshop. To do this, simply click File > Scripts > Load Files into Stack.[/vc_column_text][/vc_column][/vc_row][vc_row][vc_column][vc_single_image image=”11366″ img_size=”medium”][/vc_column][/vc_row][vc_row][vc_column][vc_column_text]Next, you’ll want to select the “Browse” option from your menu and choose which files you’d like to use in your GIF, then you will just hit “Okay.”[/vc_column_text][/vc_column][/vc_row][vc_row][vc_column][vc_single_image image=”11368″ img_size=”medium”][/vc_column][/vc_row][vc_row][vc_column][vc_column_text]Photoshop will automatically create a separate layer for each image you’ve selected.
Open the Animation window.
Your next step is to go to Windows > Animation OR Window > Timeline if you have the CS6 version.[/vc_column_text][/vc_column][/vc_row][vc_row][vc_column][vc_single_image image=”11369″ img_size=”medium”][/vc_column][/vc_row][vc_row][vc_column][vc_column_text]
Make your layers into Animation frames
You have to make sure that all your layers for this work have been selected, click on the tab in the top-right corner of your animation window. Next, select the “Make Frames from Layers” option. This should make all your frames appear in the Animation window.[/vc_column_text][/vc_column][/vc_row][vc_row][vc_column][vc_single_image image=”11370″ img_size=”medium”][/vc_column][/vc_row][vc_row][vc_column][vc_column_text]
Edit the duration of your frames
You can then go back to the button in the top-right corner of the Animation window and from the drop-down menu you can choose, “Select All Frames”.
All your frames will be selected and you can edit them with consistency. The default for each frame is a “0 sec.” You can click on any black arrow and select any length of time that works best for you. For this example, we will use 0.5 seconds, except for the last one. I’ll set the last frame to 1.0 seconds. [/vc_column_text][/vc_column][/vc_row][vc_row][vc_column][vc_single_image image=”11371″ img_size=”medium”][/vc_column][/vc_row][vc_row][vc_column][vc_column_text]
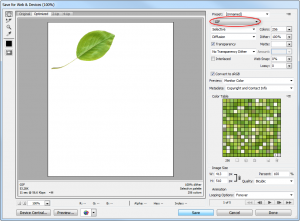
Save!
When you’re happy with your work that means it’s time to save. All you have to do is click File > Save for Web & Devices. Choose the file format as .gif and save![/vc_column_text][/vc_column][/vc_row][vc_row][vc_column][vc_single_image image=”11372″ img_size=”medium”][/vc_column][/vc_row][vc_row][vc_column][vc_single_image image=”11373″ img_size=”medium”][/vc_column][/vc_row]
Check this out while you wait!