
How to Get Started Changing Eye Color in Photoshop
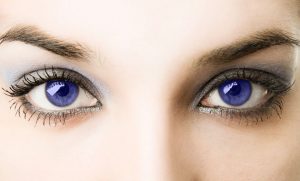
Open the photo you want to edit in Photoshop.[/vc_column_text][/vc_column][/vc_row][vc_row][vc_column][vc_single_image image=”10990″ img_size=”full”][/vc_column][/vc_row][vc_row][vc_column][vc_column_text]Select the eyes using a selection tool like Magnetic Lasso Tool or the Quick Selection Tool if you’re in a rush.
[/vc_column_text][/vc_column][/vc_row][vc_row][vc_column][vc_single_image image=”10991″ img_size=”full”][/vc_column][/vc_row][vc_row][vc_column][vc_column_text]Next, create a new layer.[/vc_column_text][/vc_column][/vc_row][vc_row][vc_column][vc_single_image image=”10992″ img_size=”full”][/vc_column][/vc_row][vc_row][vc_column][vc_column_text]Select the Brush Tool and paint over the eyes. Don’t worry, this is not the finished product lol.[/vc_column_text][/vc_column][/vc_row][vc_row][vc_column width=”1/2″][vc_single_image image=”10993″ img_size=”full”][/vc_column][vc_column width=”1/2″][vc_single_image image=”10994″ img_size=”full”][/vc_column][/vc_row][vc_row][vc_column][vc_column_text]Go to Select > Modify > Expand… and expand the selection by 3 pixels. This will give you some leeway when it comes to blending the color to your image.[/vc_column_text][/vc_column][/vc_row][vc_row][vc_column][vc_single_image image=”10995″ img_size=”full”][/vc_column][/vc_row][vc_row][vc_column][vc_column_text]Now go back to Select > Modify > Border… and enter 7 for the width.[/vc_column_text][/vc_column][/vc_row][vc_row][vc_column width=”1/2″][vc_single_image image=”10996″ img_size=”full”][/vc_column][vc_column width=”1/2″][vc_single_image image=”10997″ img_size=”full”][/vc_column][/vc_row][vc_row][vc_column][vc_column_text]After you have completed these steps, press delete to clear and deselect by pressing Ctrl + D.Change the blending to Color. You can change the opacity too if you like depending on your preference. I’ve kept at 100%.[/vc_column_text][/vc_column][/vc_row][vc_row][vc_column][vc_single_image image=”10998″ img_size=”full”][/vc_column][/vc_row][vc_row][vc_column][vc_column_text]Click on the Adjustment layer and select Hue/Saturation like you see in the image below.[/vc_column_text][/vc_column][/vc_row][vc_row][vc_column][vc_single_image image=”10999″ img_size=”full”][/vc_column][/vc_row][vc_row][vc_column][vc_column_text]This will open the Hue/Saturation dialog box. Click on the clipping mask tool. This will clip the layer to the one below it.[/vc_column_text][/vc_column][/vc_row][vc_row][vc_column][vc_single_image image=”11000″ img_size=”full”][/vc_column][/vc_row][vc_row][vc_column][vc_column_text]Now play around with the Hue & Saturation to get the desired color. No matter what you choose, you should still retain the same shine, glare, and detail of the original image to the eye looks natural, just like you see in the finished product below.[/vc_column_text][/vc_column][/vc_row][vc_row][vc_column][vc_single_image image=”11001″ img_size=”full”][/vc_column][/vc_row][vc_row][vc_column][vc_column_text]Now you can try creating your own unique images with this amazing step-by-step process.[/vc_column_text][/vc_column][/vc_row]
Check this out while you wait!