
How to Change Basic Shapes in Illustrator
Start by opening a new document by going to File, then New… or by pressing Ctrl + N.
We will start by selecting the Rectangle tool and right-click or long-press the left-click & select the Star Tool.[/vc_column_text][/vc_column][/vc_row][vc_row][vc_column][vc_single_image image=”11117″ img_size=”full”][/vc_column][/vc_row][vc_row][vc_column][vc_column_text]Click on the canvas and enter the values you want for your project. The value Points specifies the number of points for the Star shape. In this case, the star will be created with 20 points.[/vc_column_text][/vc_column][/vc_row][vc_row][vc_column][vc_single_image image=”11118″ img_size=”full”][/vc_column][/vc_row][vc_row][vc_column][vc_column_text]Click OK[/vc_column_text][/vc_column][/vc_row][vc_row][vc_column][vc_single_image image=”11119″ img_size=”full”][/vc_column][/vc_row][vc_row][vc_column][vc_column_text]Your project starts to take life when you add color. You can specify the color before clicking on the canvas or after by selecting the object & going to the color palette.[/vc_column_text][/vc_column][/vc_row][vc_row][vc_column][vc_single_image image=”11120″ img_size=”full”][/vc_column][/vc_row][vc_row][vc_column][vc_column_text]To manipulate the points:
Click on the Direct Selection tool or press A.[/vc_column_text][/vc_column][/vc_row][vc_row][vc_column][vc_single_image image=”11121″ img_size=”full”][/vc_column][/vc_row][vc_row][vc_column][vc_column_text]Then click on one of the points and start creating your cool transformation![/vc_column_text][/vc_column][/vc_row][vc_row][vc_column][vc_single_image image=”11122″ img_size=”full”][/vc_column][/vc_row][vc_row][vc_column][vc_column_text]Rounded Corners:
To get an effect like this:[/vc_column_text][/vc_column][/vc_row][vc_row][vc_column][vc_single_image image=”11123″ img_size=”full”][/vc_column][/vc_row][vc_row][vc_column][vc_column_text]Go to Effect, then Stylize, and finally Rounded Corners…[/vc_column_text][/vc_column][/vc_row][vc_row][vc_column][vc_single_image image=”11124″ img_size=”full”][/vc_column][/vc_row][vc_row][vc_column][vc_column_text]This will open a dialog box and specify the values for the Radius.[/vc_column_text][/vc_column][/vc_row][vc_row][vc_column][vc_single_image image=”11125″ img_size=”full”][/vc_column][/vc_row][vc_row][vc_column][vc_column_text]Pucker & Bloat:
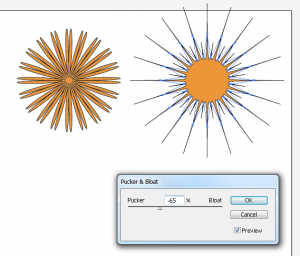
Go to Effect, then Distort, then Transform, and finally Pucker & Bloat…[/vc_column_text][/vc_column][/vc_row][vc_row][vc_column][vc_single_image image=”11126″ img_size=”full”][/vc_column][/vc_row][vc_row][vc_column][vc_column_text]This will open Pucker & Bloat dialog. Adjust the slider to the right to get the Bloat effect & towards the left to get Pucker effect which is shown in the diagram respectively.[/vc_column_text][/vc_column][/vc_row][vc_row][vc_column][vc_single_image image=”11127″ img_size=”full”][/vc_column][/vc_row][vc_row][vc_column][vc_column_text]There are many other effects that can be achieved. Check out the other options under the Distort & Transform.[/vc_column_text][/vc_column][/vc_row]
Check this out while you wait!