
If you’re ready to let the light in, just follow the simple set of instructions given below.
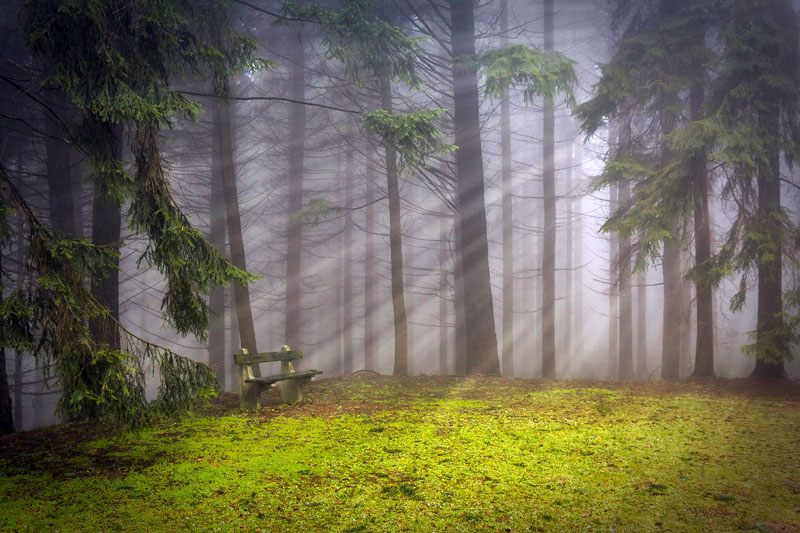
File > Open your image. In this case, I’ll be working on the image below from Pixabay.[/vc_column_text][/vc_column][/vc_row][vc_row][vc_column][vc_single_image image=”11337″ img_size=”medium”][/vc_column][/vc_row][vc_row][vc_column][vc_column_text]Create a copy of the background layer by pressing Ctrl + J just in case as a backup. Then create a new blank layer by clicking on the Create New Layer.[/vc_column_text][/vc_column][/vc_row][vc_row][vc_column][vc_single_image image=”11338″ img_size=”medium”][/vc_column][/vc_row][vc_row][vc_column][vc_column_text]Change the Foreground Color to Off-white[/vc_column_text][/vc_column][/vc_row][vc_row][vc_column][vc_single_image image=”11339″ img_size=”medium”][/vc_column][/vc_row][vc_row][vc_column][vc_column_text]Select the brush tool & change the size to 37 (yours can be different depending on the resolution of your photo), hardness 66%, Opacity 100%.[/vc_column_text][/vc_column][/vc_row][vc_row][vc_column width=”1/2″][vc_single_image image=”11340″ img_size=”medium”][/vc_column][vc_column width=”1/2″][vc_single_image image=”11341″ img_size=”medium”][/vc_column][/vc_row][vc_row][vc_column][vc_column_text]Go to Window > Brush to open the brush palette. Adjust the spacing.[/vc_column_text][/vc_column][/vc_row][vc_row][vc_column][vc_single_image image=”11342″ img_size=”medium”][/vc_column][/vc_row][vc_row][vc_column][vc_column_text]Now go to the Shape Dynamics, change the Size Jitter to 40%.[/vc_column_text][/vc_column][/vc_row][vc_row][vc_column][vc_single_image image=”11343″ img_size=”medium”][/vc_column][/vc_row][vc_row][vc_column][vc_column_text]Turn on the Scattering & adjust the Scatter. In this example, I’ve changed it to 1000%.[/vc_column_text][/vc_column][/vc_row][vc_row][vc_column][vc_single_image image=”11344″ img_size=”medium”][/vc_column][/vc_row][vc_row][vc_column][vc_column_text]Make sure your empty layer is selected, in this example, it’s layer 2 & move your mouse and scatter the brush all over or according to your image (like in the diagram).[/vc_column_text][/vc_column][/vc_row][vc_row][vc_column][vc_single_image image=”11345″ img_size=”medium”][/vc_column][/vc_row][vc_row][vc_column][vc_column_text]Now go to Filter > blur > Radial Blur… Slide the Amount to 100, Blur Method: Zoom & Quality: Best. Shift the Blur Center how you want to set the lighting. Click OK.[/vc_column_text][/vc_column][/vc_row][vc_row][vc_column][vc_single_image image=”11346″ img_size=”medium”][/vc_column][/vc_row][vc_row][vc_column][vc_single_image image=”11347″ img_size=”medium”][/vc_column][/vc_row][vc_row][vc_column][vc_column_text]Create a New Layer & change the Blend Mode to Soft Light.[/vc_column_text][/vc_column][/vc_row][vc_row][vc_column][vc_single_image image=”11348″ img_size=”medium”][/vc_column][/vc_row][vc_row][vc_column][vc_column_text]And brush over the highlight areas. Press Ctrl + F to activate the Radial Blur from the previous setting.[/vc_column_text][/vc_column][/vc_row][vc_row][vc_column][vc_single_image image=”11349″ img_size=”medium”][/vc_column][/vc_row][vc_row][vc_column][vc_column_text]Now merge the 2 light-ray layers and change the Blending Mode to Overlay. The final result looks like this.[/vc_column_text][/vc_column][/vc_row][vc_row][vc_column][vc_single_image image=”11350″ img_size=”medium”][/vc_column][/vc_row]
Check this out while you wait!