

You can also use the Magnetic Lasso Tool to start selecting around the edge of the image. This tool is more time-consuming but you will get a better result.[/vc_column_text][/vc_column][/vc_row][vc_row][vc_column width=”1/2″][vc_single_image image=”10951″ img_size=”full”][/vc_column][vc_column width=”1/2″][vc_single_image image=”10952″ img_size=”full”][/vc_column][/vc_row][vc_row][vc_column][vc_column_text]Step 3: When you finish your selection, press Ctrl+C to copy the selection. Then paste to create a new layer. Rename the new layer of your choice. I have named the example document “Reflection”.
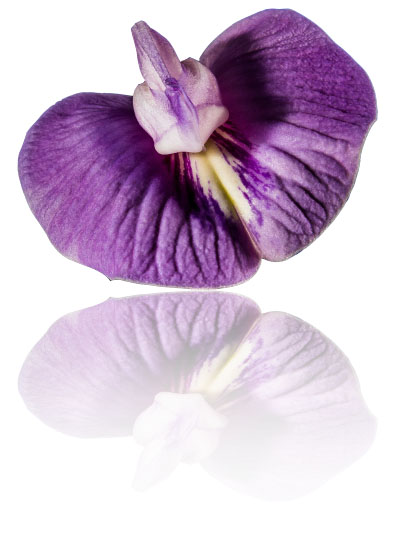
Step 4: Select the new layer “Reflection”. Press Ctrl+T or select Edit > Free Transform. Right-click inside the Transform Tool and select Flip Vertical. This will turn the image upside down. Pressing “V” will activate the Move Tool, you would then tap the down-arrow key until the bottom of the flipped image is just barely touching the bottom of the original image. You can also click-and-drag while holding shift to move the image downward in a straight line. There might not be enough room to fit the entire flipped image in the document. In this case, you can move the unflipped image up, or go to Image > Canvas Size to make the document bigger.[/vc_column_text][/vc_column][/vc_row][vc_row][vc_column width=”1/2″][vc_single_image image=”10953″ img_size=”full”][/vc_column][vc_column width=”1/2″][vc_single_image image=”10954″ img_size=”full”][/vc_column][/vc_row][vc_row][vc_column][vc_column_text]Step 5: In the Layers box, click the icon at the bottom that says “Add layer mask” when you hover over it. Press G to activate the Paint Bucket Tool. Now, right-click the Paint Bucket Tool icon and select the “Gradient Tool.” Starting at the bottom of the original image, hold Shift (to make a straight line) and click-and-drag downward, past the bottom of the flipped image. Performing this action will force the flipped image to gradually fade. Lower the Opacity of the Reflection layer as needed.[/vc_column_text][/vc_column][/vc_row][vc_row][vc_column width=”1/3″][vc_single_image image=”10955″ img_size=”full”][/vc_column][vc_column width=”1/3″][vc_single_image image=”10956″ img_size=”full”][/vc_column][vc_column width=”1/3″][vc_single_image image=”10957″ img_size=”full”][/vc_column][/vc_row][vc_row][vc_column width=”1/2″][vc_single_image image=”10958″ img_size=”full”][/vc_column][vc_column width=”1/2″][vc_single_image image=”10959″ img_size=”full”][/vc_column][/vc_row][vc_row][vc_column][vc_column_text]Step 6 (Optional): Sometimes the reflection needs to be adjusted to look more realistic. To achieve this, click the Reflection layer, and press Ctrl+T to transform the image. Press enter to load the transformation. You can then nudge the image to your liking.[/vc_column_text][/vc_column][/vc_row][vc_row][vc_column width=”1/2″][vc_single_image image=”10960″ img_size=”full”][/vc_column][vc_column width=”1/2″][vc_single_image image=”10961″ img_size=”full”][/vc_column][/vc_row]
Check this out while you wait!