

Change the Blend Mode to Overlay.[/vc_column_text][/vc_column][/vc_row][vc_row][vc_column][vc_single_image image=”11010″ img_size=”full”][/vc_column][/vc_row][vc_row][vc_column][vc_column_text]Double click on the droplet layer to open the Layer Style window. Click Inner Shadow. Change the Blend Mode to Linear Burn, the Opacity to 40%, uncheck Global Light, and make the Angle: -30°, Distance: 2px, & the Size: 5px. Depending on the size & resolution your image, the distance & size may vary.[/vc_column_text][/vc_column][/vc_row][vc_row][vc_column][vc_single_image image=”11011″ img_size=”full”][/vc_column][/vc_row][vc_row][vc_column][vc_column_text]Now click on Drop Shadow. Make the Blend Mode: Linear Burn, the Opacity: 30%, uncheck Global Light, make the Angle: 127°, Distance: 8px & Size: 14px. Then click OK.[/vc_column_text][/vc_column][/vc_row][vc_row][vc_column][vc_single_image image=”11012″ img_size=”full”][/vc_column][/vc_row][vc_row][vc_column][vc_column_text]Now we’ll put a small highlight reflection on the drop. Click on the new Layer icon & create a New Layer. We’ll name it highlight.[/vc_column_text][/vc_column][/vc_row][vc_row][vc_column][vc_single_image image=”11013″ img_size=”full”][/vc_column][/vc_row][vc_row][vc_column][vc_column_text]Now make sure that the white is in the Foreground.[/vc_column_text][/vc_column][/vc_row][vc_row][vc_column][vc_single_image image=”11014″ img_size=”full”][/vc_column][/vc_row][vc_row][vc_column][vc_column_text]Select the Brush tool and go to the Brush setting. Adjust the brush size to a small size, in this case, I’ve adjusted to 4px. Depending on your water droplet size, this number may vary. Keep the hardness at 90%.[/vc_column_text][/vc_column][/vc_row][vc_row][vc_column][vc_single_image image=”11015″ img_size=”full”][/vc_column][/vc_row][vc_row][vc_column][vc_column_text]Press down once on the upper left of your water drop.[/vc_column_text][/vc_column][/vc_row][vc_row][vc_column][vc_single_image image=”11016″ img_size=”full”][/vc_column][/vc_row][vc_row][vc_column][vc_column_text]Now the water drop is done.
To create a copy:
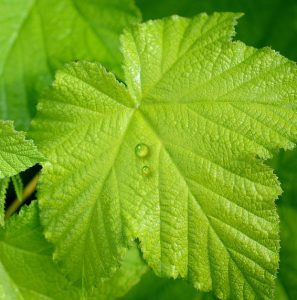
Select both the layers (Shift + click) and place them in a folder by pressing Ctrl + G. Make a copy of it.[/vc_column_text][/vc_column][/vc_row][vc_row][vc_column][vc_single_image image=”11017″ img_size=”full”][/vc_column][/vc_row][vc_row][vc_column][vc_column_text]Drag the copy to another spot and resize it to your liking (if you want to). To resize the water droplet, press Ctrl + T to activate the Transform tool and press Shift + Mouse Down to make it bigger or smaller. By pressing Shift, you can retain the perfect circle shape.[/vc_column_text][/vc_column][/vc_row][vc_row][vc_column][vc_single_image image=”11018″ img_size=”full”][/vc_column][/vc_row][vc_row][vc_column][vc_column_text]The final image will look like this:[/vc_column_text][/vc_column][/vc_row][vc_row][vc_column][vc_single_image image=”11019″ img_size=”full”][/vc_column][/vc_row]
Check this out while you wait!