

One of the most difficult parts of college is figuring out what classes you need and don’t need. Each degree requires something different, and you don’t want to miss a credit or pay extra for an unnecessary one. With the College Credit Planner, you can organize all of your classes into one Excel sheet, and automatically track what you still need for your degree.
How to use the College Credit Planner
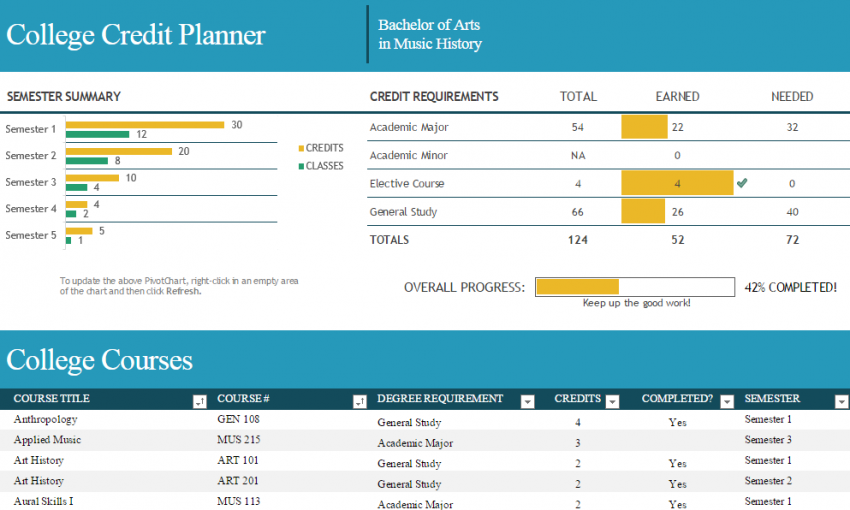
The link below will open your template in Excel. Begin by entering your degree name at the top right side. The boxes below will be automatically populated, so skip them and go down to your college courses.
This is where you will enter in all of the courses needed for your degree. You can get this list online, or from your academic advisor. The one you receive from your school will not have your electives added. Input the name, number, category of requirement, number of credits, and the semester you will attend the class. If you are unsure about a class, just put it into the spreadsheet and change it when you have decided. As long as the credits number and degree requirement column is the same, it will not change your data.
After all of that is filled out, go to the tab at the bottom of the page that says “Semester Summary Data”. This page shows a quick summary of your credit hours and number of classes for each semester. If you add or drop any classes, go to this page and right click on “Credits” and choose “Refresh” to show your new summary.
Tab back to the original page. At the top, your information has been updated to reflect your data. Completion bars are generated to show your progress in each credit category, along with an overall bar to show your progress.
Tips on using the College Credit Planner
- Don’t add any classes that aren’t part of your degree requirements that you’re taking anyway. This will throw off your data.
- To view each category together, go the category name and select the down arrow in the white box next to it. Then, choose ascending or descending, and the chart will arrange to show the category in your preferred order.
- After you finish, ask your academic advisor to review it and confirm that those are your required classes.
Download the College Credit Planner
Template courtesy of Microsoft
Check this out while you wait!